DirectX 11 Tutorials 2 - 创建框架和窗口

原文链接:http://www.rastertek.com/dx11s2tut02.html

在开始使用 DirectX 11 编码之前,我建议构建一个简单的代码框架。该框架将处理基本的窗口功能,并为学习 DirectX 11 提供一种以有组织和可读的方式扩展代码的简单方法。由于这些教程的目的只是尝试 DirectX 11 的不同功能,而不是构建完整的渲染引擎,所以我们将有目的地尽可能保持框架精简。一旦你掌握了DirectX 11,你就可以研究如何构建一个现代化的图形渲染引擎。

框架简介

框架从以下四部分着手搭建:

  1. WinMain 函数来处理应用程序的入口点。
  2. 定义 SystemClass,封装从 WinMain 函数中调用的整个应用程序
  3. 在系统类中,我们定义 GraphicsClass 来处理 DirectX 图形代码;
  4. 除此之外,定义 InputClass 来处理用户的输入。

框架设置示意图如下:
框架示意图

WinMain

1
2
3
4
5
6
7
8
9
10
11
12
13
14
15
16
17
18
19
20
21
22
23
24
25
26
27
28
29
30
31
32
33
////////////////////////////////////////////////////////////////////////////////
// Filename: main.cpp
////////////////////////////////////////////////////////////////////////////////
#include "systemclass.h"


int WINAPI WinMain(HINSTANCE hInstance, HINSTANCE hPrevInstance, PSTR pScmdline, int iCmdshow)
{
SystemClass* System;
bool result;


// Create the system object.
System = new SystemClass;
if(!System)
{
return 0;
}

// Initialize and run the system object.
result = System->Initialize();
if(result)
{
System->Run();
}

// Shutdown and release the system object.
System->Shutdown();
delete System;
System = 0;

return 0;
}

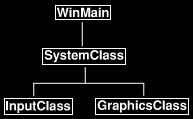
正如您所见,我们保持了 WinMain 函数的简单性。我们创建 SystemClass,然后初始化它。如果初始化没有问题,那么我们调用 SystemClassRun 函数。

Run 函数将运行自己的循环并执行所有应用程序代码,直到完成所有逻辑。

Run 函数完成后,我们关闭 SystemClass 并对资源进行清理。

因此,我们保持了它的简单性,并将整个应用程序封装在系统类中。

现在让我们来看一下 SystemClass 头文件:

Systemclass.h

1
2
3
4
5
////////////////////////////////////////////////////////////////////////////////
// Filename: systemclass.h
////////////////////////////////////////////////////////////////////////////////
#ifndef _SYSTEMCLASS_H_
#define _SYSTEMCLASS_H_

这里我们定义 WIN32_LEAN_AND_MEAN。我们这样做是为了加快构建过程:这个宏将通过排除一些较少使用的 API 来减少 Win32 头文件的大小。

1
2
3
4
///////////////////////////////
// PRE-PROCESSING DIRECTIVES //
///////////////////////////////
#define WIN32_LEAN_AND_MEAN

此时,我们已经在框架中包含了其他两个类的头文件,因此我们可以在 SystemClass 中使用它们。

1
2
3
4
5
///////////////////////
// MY CLASS INCLUDES //
///////////////////////
#include "inputclass.h"
#include "graphicsclass.h"

Windows.h 包含在内,我们才可以通过调用函数来创建或者销毁窗口,并能够使用其他有用的 Win32 函数。

1
2
3
4
//////////////
// INCLUDES //
//////////////
#include <windows.h>

这个类的定义相当简单,我们可以看到,WinMain 中调用的 InitializeShutdownRun 函数都是在这里定义的。

除此之外,还有一些私有函数将在这些函数中调用。

我们还在类中添加了 MessageHandler 函数来处理 Windows 系统的消息,这些消息将在应用程序运行时发送到应用程序。

最后,我们定义连个私有变量:m_Inputm_Graphics,它们将分别指向处理输入和图形的两个系统对象。

1
2
3
4
5
6
7
8
9
10
11
12
13
14
15
16
17
18
19
20
21
22
23
24
25
26
27
28
29
30
31
32
33
34
35
36
37
38
39
40
41
42
43
44
////////////////////////////////////////////////////////////////////////////////
// Class name: SystemClass
////////////////////////////////////////////////////////////////////////////////
class SystemClass
{
public:
SystemClass();
SystemClass(const SystemClass&);
~SystemClass();

bool Initialize();
void Shutdown();
void Run();

LRESULT CALLBACK MessageHandler(HWND, UINT, WPARAM, LPARAM);

private:
bool Frame();
void InitializeWindows(int&, int&);
void ShutdownWindows();

private:
LPCWSTR m_applicationName;
HINSTANCE m_hinstance;
HWND m_hwnd;

InputClass* m_Input;
GraphicsClass* m_Graphics;
};


/////////////////////////
// FUNCTION PROTOTYPES //
/////////////////////////
static LRESULT CALLBACK WndProc(HWND, UINT, WPARAM, LPARAM);


/////////////
// GLOBALS //
/////////////
static SystemClass* ApplicationHandle = 0;


#endif

WndProc 函数和 ApplicationHandle 指针也包含在这个类文件中,因此我们可以在 SystemClass 中将 Windows 系统的消息重定向到我们自己的 MessageHandler 函数中。

现在让我们看看 SystemClass 源文件:

Systemclass.cpp

1
2
3
4
////////////////////////////////////////////////////////////////////////////////
// Filename: systemclass.cpp
////////////////////////////////////////////////////////////////////////////////
#include "systemclass.h"

在类构造函数中,我将成员对象指针初始化为空,这一点很重要,因为如果这些对象的初始化失败,那么接下来的 Shutdown 函数将尝试清理这些对象。

如果对象不为空,那么它会假定它们是被有效创建的对象,并且他们需要被清理。

将应用程序中的所有指针和变量初始化为空也是一种很好的习惯,如果不这样做,某些发布版本可能将生成失败。

1
2
3
4
5
SystemClass::SystemClass()
{
m_Input = 0;
m_Graphics = 0;
}

在这里,我创建了一个空的拷贝构造函数和空的析构函数,在这个类中,我不需要它们,但如果没有定义,一些编译器将为您生成它们,既然这样的话,我更希望它们是空的。

你也会注意到我没有在析构函数中进行任何对象的清理工作,相反,我会在 Shutdown 函数中清理所有对象,关于这些内容你会在下面看到。

我这样做的原因是我不信任它总是会被调用:某些 Windows 函数(如 ExitThread())不调用类析构函数,这会导致内存泄漏。当然,现在的你可以调用这些函数的安全版本,但我只是在 Windows 上编程时更加小心。

1
2
3
4
5
6
7
8
SystemClass::SystemClass(const SystemClass& other)
{
}


SystemClass::~SystemClass()
{
}

下面的初始化函数将完成应用程序的所有设置:首先调用 InitializeWindows 函数,它将创建应用程序要使用的窗口,然后创建和初始化应用程序将用于处理用户输入的 input 对象和向屏幕输出图形的 graphics 对象。

1
2
3
4
5
6
7
8
9
10
11
12
13
14
15
16
17
18
19
20
21
22
23
24
25
26
27
28
29
30
31
32
33
34
35
36
37
38
39
bool SystemClass::Initialize()
{
int screenWidth, screenHeight;
bool result;


// Initialize the width and height of the screen to zero before sending the variables into the function.
screenWidth = 0;
screenHeight = 0;

// Initialize the windows api.
InitializeWindows(screenWidth, screenHeight);

// Create the input object. This object will be used to handle reading the keyboard input from the user.
m_Input = new InputClass;
if(!m_Input)
{
return false;
}

// Initialize the input object.
m_Input->Initialize();

// Create the graphics object. This object will handle rendering all the graphics for this application.
m_Graphics = new GraphicsClass;
if(!m_Graphics)
{
return false;
}

// Initialize the graphics object.
result = m_Graphics->Initialize(screenWidth, screenHeight, m_hwnd);
if(!result)
{
return false;
}

return true;
}

Shutdown 函数进行清理工作:它会关闭并释放与图形和输入对象相关的所有内容。此外,它还关闭窗口并清理与之相关的句柄。

1
2
3
4
5
6
7
8
9
10
11
12
13
14
15
16
17
18
19
20
21
22
void SystemClass::Shutdown()
{
// Release the graphics object.
if(m_Graphics)
{
m_Graphics->Shutdown();
delete m_Graphics;
m_Graphics = 0;
}

// Release the input object.
if(m_Input)
{
delete m_Input;
m_Input = 0;
}

// Shutdown the window.
ShutdownWindows();

return;
}

Run 函数是应用程序循环并执行所有应用程序逻辑的地方,直到我们决定退出。

应用程序逻辑在每次循环都被调用的 Frame 函数中完成。这是一个需要理解的重要概念,因为在编写应用程序的其余部分时,必须牢记这一点。

伪代码如下所示:

1
2
3
4
5
while not 程序退出
检查 Windows 系统消息
处理系统消息
执行应用程序主循环
检查用户是否想要退出程序
1
2
3
4
5
6
7
8
9
10
11
12
13
14
15
16
17
18
19
20
21
22
23
24
25
26
27
28
29
30
31
32
33
34
35
36
37
38
39
void SystemClass::Run()
{
MSG msg;
bool done, result;


// Initialize the message structure.
ZeroMemory(&msg, sizeof(MSG));

// Loop until there is a quit message from the window or the user.
done = false;
while(!done)
{
// Handle the windows messages.
if(PeekMessage(&msg, NULL, 0, 0, PM_REMOVE))
{
TranslateMessage(&msg);
DispatchMessage(&msg);
}

// If windows signals to end the application then exit out.
if(msg.message == WM_QUIT)
{
done = true;
}
else
{
// Otherwise do the frame processing.
result = Frame();
if(!result)
{
done = true;
}
}

}

return;
}

下面的 Frame 函数是完成应用程序所有逻辑的地方。

到目前为止,它相当简单,我们检查 input 对象,看看用户是否按下了 escape 键并想退出;如果他们不想退出,那么我们调用 graphics 对象来为该帧渲染图形。

随着应用程序的逐渐复杂,我们将在这里放置更多代码。

1
2
3
4
5
6
7
8
9
10
11
12
13
14
15
16
17
18
19
20
bool SystemClass::Frame()
{
bool result;


// Check if the user pressed escape and wants to exit the application.
if(m_Input->IsKeyDown(VK_ESCAPE))
{
return false;
}

// Do the frame processing for the graphics object.
result = m_Graphics->Frame();
if(!result)
{
return false;
}

return true;
}

MessageHandler 函数是我们处理 Windows 系统消息的地,我们可以监听我们感兴趣的信息。

目前,我们只需读取某个键是否被按下或被释放,然后将该信息传递给 input 对象,所有的其他消息我没将传递给 Windows 默认的消息处理函数来处理。

1
2
3
4
5
6
7
8
9
10
11
12
13
14
15
16
17
18
19
20
21
22
23
24
25
26
27
LRESULT CALLBACK SystemClass::MessageHandler(HWND hwnd, UINT umsg, WPARAM wparam, LPARAM lparam)
{
switch(umsg)
{
// Check if a key has been pressed on the keyboard.
case WM_KEYDOWN:
{
// If a key is pressed send it to the input object so it can record that state.
m_Input->KeyDown((unsigned int)wparam);
return 0;
}

// Check if a key has been released on the keyboard.
case WM_KEYUP:
{
// If a key is released then send it to the input object so it can unset the state for that key.
m_Input->KeyUp((unsigned int)wparam);
return 0;
}

// Any other messages send to the default message handler as our application won't make use of them.
default:
{
return DefWindowProc(hwnd, umsg, wparam, lparam);
}
}
}

InitializeWindows 函数内我们编写用于构建渲染窗口的代码。它将 screenWidthscreenHeight 返回给调用函数,以便我们可以在整个应用程序中使用它们。

我们使用一些默认设置来创建并初始化窗口一个纯黑的无边框窗口。

该函数将根据名为 FULL_SCREEN 的全局变量来决定是生成一个小窗口还是一个全屏窗口。如果设置为 true,那么我们将使屏幕覆盖整个用户桌面窗口;如果设置为 false,我们只需在屏幕中间创建一个 800×600 的窗口。我将 FULL_SCREEN 全局变量放到了 graphicsclass.h 文件的顶部以便修改。

稍后你将理解为什么我将这个全局变量放在该文件内,而不是该文件所包含的其他头文件中。

1
2
3
4
5
6
7
8
9
10
11
12
13
14
15
16
17
18
19
20
21
22
23
24
25
26
27
28
29
30
31
32
33
34
35
36
37
38
39
40
41
42
43
44
45
46
47
48
49
50
51
52
53
54
55
56
57
58
59
60
61
62
63
64
65
66
67
68
69
70
71
72
73
74
75
76
77
78
79
80
void SystemClass::InitializeWindows(int& screenWidth, int& screenHeight)
{
WNDCLASSEX wc;
DEVMODE dmScreenSettings;
int posX, posY;


// Get an external pointer to this object.
ApplicationHandle = this;

// Get the instance of this application.
m_hinstance = GetModuleHandle(NULL);

// Give the application a name.
m_applicationName = L"Engine";

// Setup the windows class with default settings.
wc.style = CS_HREDRAW | CS_VREDRAW | CS_OWNDC;
wc.lpfnWndProc = WndProc;
wc.cbClsExtra = 0;
wc.cbWndExtra = 0;
wc.hInstance = m_hinstance;
wc.hIcon = LoadIcon(NULL, IDI_WINLOGO);
wc.hIconSm = wc.hIcon;
wc.hCursor = LoadCursor(NULL, IDC_ARROW);
wc.hbrBackground = (HBRUSH)GetStockObject(BLACK_BRUSH);
wc.lpszMenuName = NULL;
wc.lpszClassName = m_applicationName;
wc.cbSize = sizeof(WNDCLASSEX);

// Register the window class.
RegisterClassEx(&wc);

// Determine the resolution of the clients desktop screen.
screenWidth = GetSystemMetrics(SM_CXSCREEN);
screenHeight = GetSystemMetrics(SM_CYSCREEN);

// Setup the screen settings depending on whether it is running in full screen or in windowed mode.
if(FULL_SCREEN)
{
// If full screen set the screen to maximum size of the users desktop and 32bit.
memset(&dmScreenSettings, 0, sizeof(dmScreenSettings));
dmScreenSettings.dmSize = sizeof(dmScreenSettings);
dmScreenSettings.dmPelsWidth = (unsigned long)screenWidth;
dmScreenSettings.dmPelsHeight = (unsigned long)screenHeight;
dmScreenSettings.dmBitsPerPel = 32;
dmScreenSettings.dmFields = DM_BITSPERPEL | DM_PELSWIDTH | DM_PELSHEIGHT;

// Change the display settings to full screen.
ChangeDisplaySettings(&dmScreenSettings, CDS_FULLSCREEN);

// Set the position of the window to the top left corner.
posX = posY = 0;
}
else
{
// If windowed then set it to 800x600 resolution.
screenWidth = 800;
screenHeight = 600;

// Place the window in the middle of the screen.
posX = (GetSystemMetrics(SM_CXSCREEN) - screenWidth) / 2;
posY = (GetSystemMetrics(SM_CYSCREEN) - screenHeight) / 2;
}

// Create the window with the screen settings and get the handle to it.
m_hwnd = CreateWindowEx(WS_EX_APPWINDOW, m_applicationName, m_applicationName,
WS_CLIPSIBLINGS | WS_CLIPCHILDREN | WS_POPUP,
posX, posY, screenWidth, screenHeight, NULL, NULL, m_hinstance, NULL);

// Bring the window up on the screen and set it as main focus.
ShowWindow(m_hwnd, SW_SHOW);
SetForegroundWindow(m_hwnd);
SetFocus(m_hwnd);

// Hide the mouse cursor.
ShowCursor(false);

return;
}

ShutdownWindows 函数仅仅是将屏幕设置恢复正常,并释放窗口及其相关的句柄。

1
2
3
4
5
6
7
8
9
10
11
12
13
14
15
16
17
18
19
20
21
22
23
24
void SystemClass::ShutdownWindows()
{
// Show the mouse cursor.
ShowCursor(true);

// Fix the display settings if leaving full screen mode.
if(FULL_SCREEN)
{
ChangeDisplaySettings(NULL, 0);
}

// Remove the window.
DestroyWindow(m_hwnd);
m_hwnd = NULL;

// Remove the application instance.
UnregisterClass(m_applicationName, m_hinstance);
m_hinstance = NULL;

// Release the pointer to this class.
ApplicationHandle = NULL;

return;
}

WndProc 函数是 Windows 系统发送消息的目的地,你可以注意到,当我们在 InitializeWindows 函数顶部使用 wc.lpfnWndProc = WndProc 初始化窗口类的时候,就已经告诉了 Windows 系统回调函数的名字。我将其包含在这个类文件中,因为我们让它将所有消息发送到 SystemClass 中定义的 MessageHandler 函数,从而将其直接绑定到 system 类中。这使我们能够将消息传递功能直接挂接到类中,并保持代码整洁。

1
2
3
4
5
6
7
8
9
10
11
12
13
14
15
16
17
18
19
20
21
22
23
24
25
LRESULT CALLBACK WndProc(HWND hwnd, UINT umessage, WPARAM wparam, LPARAM lparam)
{
switch(umessage)
{
// Check if the window is being destroyed.
case WM_DESTROY:
{
PostQuitMessage(0);
return 0;
}

// Check if the window is being closed.
case WM_CLOSE:
{
PostQuitMessage(0);
return 0;
}

// All other messages pass to the message handler in the system class.
default:
{
return ApplicationHandle->MessageHandler(hwnd, umessage, wparam, lparam);
}
}
}

Inputclass.h

为了保持教程的简单,我暂时使用 Windows 系统自带的消息输入系统,直到我完成 DirectInput 的教程(DirectInput 是更好的选择)。

input 类用来处理来自键盘的用户输入,此类由 SystemClass::MessageHandler 函数提供输入。

输入对象将在键盘数组中存储每个键的状态,当被查询时,它会告诉调用者某个键是否被按下。

以下是头文件内容:

1
2
3
4
5
6
7
8
9
10
11
12
13
14
15
16
17
18
19
20
21
22
23
24
25
26
27
28
29
////////////////////////////////////////////////////////////////////////////////
// Filename: inputclass.h
////////////////////////////////////////////////////////////////////////////////
#ifndef _INPUTCLASS_H_
#define _INPUTCLASS_H_


////////////////////////////////////////////////////////////////////////////////
// Class name: InputClass
////////////////////////////////////////////////////////////////////////////////
class InputClass
{
public:
InputClass();
InputClass(const InputClass&);
~InputClass();

void Initialize();

void KeyDown(unsigned int);
void KeyUp(unsigned int);

bool IsKeyDown(unsigned int);

private:
bool m_keys[256];
};

#endif

Inputclass.cpp

1
2
3
4
5
6
7
8
9
10
11
12
13
14
15
16
17
18
19
20
21
22
23
24
25
26
27
28
29
30
31
32
33
34
35
36
37
38
39
40
41
42
43
44
45
46
47
48
49
50
51
52
53
54
55
56
57
////////////////////////////////////////////////////////////////////////////////
// Filename: inputclass.cpp
////////////////////////////////////////////////////////////////////////////////
#include "inputclass.h"


InputClass::InputClass()
{
}


InputClass::InputClass(const InputClass& other)
{
}


InputClass::~InputClass()
{
}


void InputClass::Initialize()
{
int i;


// Initialize all the keys to being released and not pressed.
for(i=0; i<256; i++)
{
m_keys[i] = false;
}

return;
}


void InputClass::KeyDown(unsigned int input)
{
// If a key is pressed then save that state in the key array.
m_keys[input] = true;
return;
}


void InputClass::KeyUp(unsigned int input)
{
// If a key is released then clear that state in the key array.
m_keys[input] = false;
return;
}


bool InputClass::IsKeyDown(unsigned int key)
{
// Return what state the key is in (pressed/not pressed).
return m_keys[key];
}

Graphicsclass.h

graphics 类是由 system 类创建的另一个对象,应用程序中的用到的所有图形功能都将封装在这个类中。

我们还将在这个文件中使用所有与我们可能希望改变的全局图形设置(如全屏或窗口模式)相关的头文件,目前该类是空的,但在未来的教程中,它将包含所有与图形相关的对象。

1
2
3
4
5
6
7
8
9
10
11
12
13
14
15
16
17
18
19
20
////////////////////////////////////////////////////////////////////////////////
// Filename: graphicsclass.h
////////////////////////////////////////////////////////////////////////////////
#ifndef _GRAPHICSCLASS_H_
#define _GRAPHICSCLASS_H_


//////////////
// INCLUDES //
//////////////
#include <windows.h>


/////////////
// GLOBALS //
/////////////
const bool FULL_SCREEN = false;
const bool VSYNC_ENABLED = true;
const float SCREEN_DEPTH = 1000.0f;
const float SCREEN_NEAR = 0.1f;

我们将使用这四个全局常量来开始。

1
2
3
4
5
6
7
8
9
10
11
12
13
14
15
16
17
18
19
20
21
22
23
////////////////////////////////////////////////////////////////////////////////
// Class name: GraphicsClass
////////////////////////////////////////////////////////////////////////////////
class GraphicsClass
{
public:
GraphicsClass();
GraphicsClass(const GraphicsClass&);
~GraphicsClass();

bool Initialize(int, int, HWND);
void Shutdown();
bool Frame();

private:
bool Render();

private:

};

#endif

Graphicsclass.cpp

由于我们现在仅仅是为本教程构建框架,所以我暂时将这个类保持为空。

1
2
3
4
5
6
7
8
9
10
11
12
13
14
15
16
17
18
19
20
21
22
23
24
25
26
27
28
29
30
31
32
33
34
35
36
37
38
39
40
41
42
43
44
45
46
47
48
////////////////////////////////////////////////////////////////////////////////
// Filename: graphicsclass.cpp
////////////////////////////////////////////////////////////////////////////////
#include "graphicsclass.h"


GraphicsClass::GraphicsClass()
{
}


GraphicsClass::GraphicsClass(const GraphicsClass& other)
{
}


GraphicsClass::~GraphicsClass()
{
}


bool GraphicsClass::Initialize(int screenWidth, int screenHeight, HWND hwnd)
{

return true;
}


void GraphicsClass::Shutdown()
{

return;
}


bool GraphicsClass::Frame()
{

return true;
}


bool GraphicsClass::Render()
{

return true;
}

总结

到现在为止,我们有了一个框架和一个可以在屏幕上显示的窗口。

这个框架现在将是所有未来教程的基础,所以理解这个框架是相当重要的。

在继续下一个教程之前,请尝试进行练习部分,以确保代码可以被正确编译。

如果你不理解这个框架,你仍然可以继续学习其他教程,随着框架的内容被逐渐填充,它们各部分的含义将更容易被理解。

练习

graphicsclass.h 中将 FULL_SCREEN 参数更改为 true,然后重新编译该头文件;窗口显示后,按 escape 键可以退出。

作者

Voidmatrix

发布于

2022-03-05

更新于

2022-03-11

许可协议

评论